VPS配置不可描述服务
准备工作
- 一台域外VPS
- 一个域名
- 将域名解析到VPS的IP上。
1. 开启bbr优化
1
wget -N --no-check-certificate "https://github.000060000.xyz/tcp.sh" && chmod +x tcp.sh && ./tcp.sh
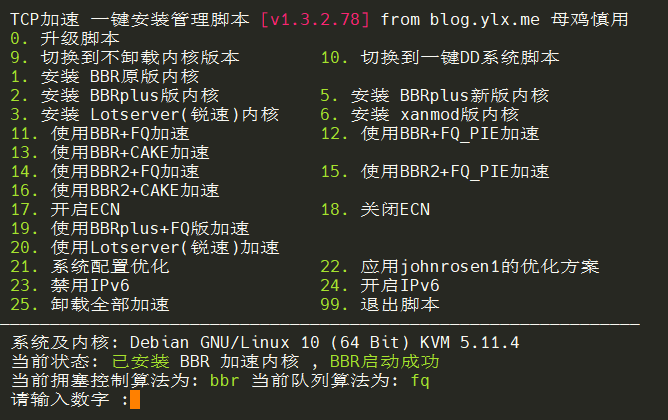
先输入11,启用bbr+fq加速,然后输入22,应用优化方案,之后需要重启VPS。
2. 安装xray
1
bash -c "$(curl -L https://github.com/XTLS/Xray-install/raw/main/install-release.sh)" @ install
3. 安装acme脚本
1
curl https://get.acme.sh | bash
4. 创建Geo脚本
vi /usr/local/bin/xray-geo
1
2
3
4
5
6
7
8
#!/bin/bash
rm -fr /usr/local/share/xray/geo*.dat
wget -O /usr/local/share/xray/geoip.dat https://cdn.jsdelivr.net/gh/Loyalsoldier/v2ray-rules-dat@release/geoip.dat
wget -O /usr/local/share/xray/geosite.dat https://cdn.jsdelivr.net/gh/Loyalsoldier/v2ray-rules-dat@release/geosite.dat
echo 'Geo Files have been updated'

systemctl restart xray
echo 'Xray service restarted'
给予可执行权限
1
chmod +x /usr/local/bin/xray-geo
5. 申请SSL证书及安装证书
申请证书
1
/root/.acme.sh/acme.sh --issue -d www.example.com --standalone
安装证书
1
2
3
/root/.acme.sh/acme.sh --install-cert -d www.example.com --fullchain-file /usr/local/etc/xray/example.cer --key-file /usr/local/etc/xray/example.key

chown nobody.root /usr/local/etc/xray/example.*
为了便于未来自动更新证书,可以创建如下脚本,放入crontab自动执行。
1
vi /usr/local/bin/xray-renew
文件内容:
1
2
3
4
5
6
7
8
9
10
#!/bin/bash
/root/.acme.sh/acme.sh --install-cert -d www.exmaple.com --fullchain-file /usr/local/etc/xray/example.cer --key-file /usr/local/etc/xray/example.key
echo "Xray Certificates Renewed"

chown nobody.root /usr/local/etc/xray/example.*

echo "User&Group Changed for Xray"

systemctl restart xray
echo "Xray Restarted"
授予可执行权限
1
chmod +x /usr/local/bin/xray-renew
增加计划任务
1
crontab -e
在文件中增加如下内容,意思是每个星期五的凌晨2点执行一次 xray-renew 脚本。
1
0 2 * * 5 bash /usr/local/bin/xray-renew
可看下图

6. 生成UUID,修改配置文件
在命令提示符下输入下面的命令,就会返回一个新生成的UUID,将这个UUID保存一下。
1
2
root@nerd:~# xray uuid
f47cdd50-7468-4758-afb8-1fd3a4887a49
在下面的xray配置文件中,修改所有的uuid为上面生成的UUID。
1
2
3
4
5
6
7
8
9
10
11
12
13
14
15
16
17
18
19
20
21
22
23
24
25
26
27
28
29
30
31
32
33
34
35
36
37
38
39
40
41
42
43
44
45
46
47
48
49
50
51
52
53
54
55
56
57
58
59
60
61
62
63
64
65
66
67
68
69
70
71
72
73
74
75
76
77
78
79
80
81
82
83
84
85
86
87
88
89
90
91
92
93
94
95
96
97
98
99
100
101
102
103
104
105
106
107
108
109
110
111
112
113
114
115
116
117
118
119
120
121
122
123
124
125
126
127
128
129
130
131
132
133
134
135
136
137
138
139
140
141
142
143
144
145
146
147
148
149
150
151
152
153
154
155
156
157
158
159
160
161
162
163
164
165
166
167
168
169
170
171
172
173
174
175
176
177
178
179
180
181
182
183
184
185
186
187
188
189
190
191
192
193
194
195
196
197
198
199
200
201
202
203
204
205
206
207
208
209
210
211
212
213
214
215
216
217
218
219
220
221
222
223
224
225
226
227
228
229
230
231
232
233
234
235
236
237
238
239
240
241
242
243
244
{
    // 1_日志设置
    "log": {
        "loglevel": "warning",
        "access": "/var/log/xray/access.log",
        "error": "/var/log/xray/error.log"
    },
    // 2_路由设置(白名单)
    "routing": {
        "rules": [
            {
              "type": "field",
              "outboundTag": "Reject",
              "domain": [
                "geosite:category-ads-all"
              ]
            },
            {
              "type": "field",
              "outboundTag": "Direct",
              "domain": [
                "geosite:private",
                "geosite:apple-cn",
                "geosite:google-cn",
                "geosite:tld-cn",
                "geosite:category-games@cn"
              ]
            },
            {
              "type": "field",
              "outboundTag": "Proxy",
              "domain": [
                "geosite:geolocation-!cn"
              ]
            },
            {
              "type": "field",
              "outboundTag": "Direct",
              "domain": [
                "geosite:cn"
              ]
            },
            {
             "type": "field",
             "outboundTag": "Proxy",
             "network": "tcp,udp"
            }
        ]
    },
    // 3_DNS设置
    "dns": {
        "hosts": {
          "dns.google": "8.8.4.4",
          "doh.pub": "119.29.29.29"
        },
        "servers": [
          "https://dns.google/dns-query",
        {
          "address": "https+local://223.5.5.5/dns-query",
          "domains": [
            "geosite:cn",
            "geosite:icloud",
            "geosite:category-games@cn"
          ],
          "expectIPs": [
            "geoip:cn"
          ]
        },
        {
          "address": "https://1.1.1.1/dns-query",
          "domains": [
            "geosite:geolocation-!cn"
          ]
        }
      ]
    },
    // 4_入站设置
    "inbounds": [
        {
            "port": 8443,
            "protocol": "vless",
            "settings": {
                "clients": [
                    {
                        "id": "uuid", // 填写你的 UUID
                        "flow": "xtls-rprx-direct",
                        "level": 0,
                        "email": "love@example.com"
                    }
                ],
                "decryption": "none",
                "fallbacks": [
                    {
                        "dest": 1310, // 默认回落到 Xray 的 Trojan 协议
                        "xver": 1
                    },
                    {
                        "path": "/ws1169", // 必须换成自定义的 PATH
                        "dest": 1234,
                        "xver": 1
                    },
                    {
                        "path": "/vst1170", // 必须换成自定义的 PATH
                        "dest": 2345,
                        "xver": 1
                    },
                    {
                        "path": "/vmw1171", // 必须换成自定义的 PATH
                        "dest": 3456,
                        "xver": 1
                    }
                ]
            },
            "streamSettings": {
                "network": "tcp",
                "security": "xtls",
                "xtlsSettings": {
                    "alpn": [
                        "http/1.1"
                    ],
                    "certificates": [
                        {
                            "certificateFile": "/usr/local/etc/xray/example.cer", //SSL证书
                            "keyFile": "/usr/local/etc/xray/example.key" //ssl密钥
                        }
                    ]
                }
            }
        },
        {
            "port": 1310,
            "listen": "127.0.0.1",
            "protocol": "trojan",
            "settings": {
                "clients": [
                    {
                        "password": "mima", // 填写你的密码
                        "level": 0,
                        "email": "love@example.com"
                    }
                ],
                "fallbacks": [
                    {
                        "dest": 80 // 或者回落到其它也防探测的代理
                    }
                ]
            },
            "streamSettings": {
                "network": "tcp",
                "security": "none",
                "tcpSettings": {
                    "acceptProxyProtocol": true
                }
            }
        },
        {
            "port": 1234,
            "listen": "127.0.0.1",
            "protocol": "vless",
            "settings": {
                "clients": [
                    {
                        "id": "uuid", // 填写你的 UUID
                        "level": 0,
                        "email": "love@example.com"
                    }
                ],
                "decryption": "none"
            },
            "streamSettings": {
                "network": "ws",
                "security": "none",
                "wsSettings": {
                    "acceptProxyProtocol": true, // 提醒:若你用 Nginx/Caddy 等反代 WS,需要删掉这行
                    "path": "/ws1169" // 必须换成自定义的 PATH,需要和分流的一致
                }
            }
        },
        {
            "port": 2345,
            "listen": "127.0.0.1",
            "protocol": "vmess",
            "settings": {
                "clients": [
                    {
                        "id": "uuid", // 填写你的 UUID
                        "level": 0,
                        "email": "love@example.com"
                    }
                ]
            },
            "streamSettings": {
                "network": "tcp",
                "security": "none",
                "tcpSettings": {
                    "acceptProxyProtocol": true,
                    "header": {
                        "type": "http",
                        "request": {
                            "path": [
                                "/vst1170" // 必须换成自定义的 PATH,需要和分流的一致
                            ]
                        }
                    }
                }
            }
        },
        {
            "port": 3456,
            "listen": "127.0.0.1",
            "protocol": "vmess",
            "settings": {
                "clients": [
                    {
                        "id": "uuid", // 填写你的 UUID
                        "level": 0,
                        "email": "love@example.com"
                    }
                ]
            },
            "streamSettings": {
                "network": "ws",
                "security": "none",
                "wsSettings": {
                    "acceptProxyProtocol": true, // 提醒:若你用 Nginx/Caddy 等反代 WS,需要删掉这行
                    "path": "/vmw1171" // 必须换成自定义的 PATH,需要和分流的一致
                }
            }
        }
    ],
    // 5_出站设置
    "outbounds": [
        // 5.1 第一个出站是默认规则,freedom就是对外直连(vps已经是外网,所以直连)
        {
            "tag": "direct",
            "protocol": "freedom"
        },
        // 5.2 屏蔽规则,blackhole协议就是把流量导入到黑洞里(屏蔽)
        {
            "tag": "block",
            "protocol": "blackhole"
        }
    ]
}
建议copy出来,粘贴到notepad等文本编辑器中修改,修改好后,复制全文,粘贴到xray的/usr/local/etc/xray/config.json文件中,或者,另存为config.json并上传到/usr/local/etc/xray目录中。
7. 更新资源文件并重启
1
xray-geo
8. 检查服务是否在监听中
1
ss -lptun
查看监听端口

great! 服务已经启动了。现在可以在你本地的openwrt或者客户端中配置并使用了,客户端的配置我就不赘述了。
《全文完》
本文由作者按照 CC BY 4.0 进行授权